
 sending...
A path to developing confidence for hunting shots
We see in the Fouling Shot discussion that the quest for pin-point accuracy can lead to confusion about what accuracy is “good enough” for hunting. The short answer is to keep the range of your shots at medium game close enough that you can expect the first and the next two “follow up” shots will impact within a ten-inch circle. Finding your rifle’s typical hunting accuracy will take several trips to the range and a little bit of thinking about your bullet’s trajectory and dispersion.
The multiple range session advice is that one needs to know where the first shot of the day tends to go. The barrel must have the same amount of cleanliness, fouling, and be in the cold state for this shot. The zero needs to be adjusted to make this cluster impact where you want it to be. Second, one needs to know where the second and third shots one might take as follow up shots will go. The center of this second cluster should be within about an inch of the cluster of shots representing the first shots at 100 yards. This procedure will give reasonable assurance that most of your shots will hit within the 10” canonical vital zone out to 300 yards when appropriate wind and drop adjustments are made.
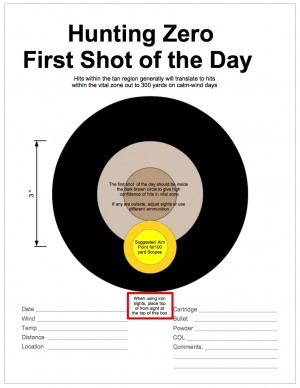
Figure 1. Hunting Zero Target #1. Use this target at 100 yards for the very first shot in each of five range sessions using the same sight settings. Clicking on the picture downloads a PDF of the target that may be printed and used on the range.
These two targets are designed to help develop the hunting zero. They are set up for the most common distance available at public shooting ranges: 100 yards. The aim point for scope-sighted rifles is the center of the yellow circle. One places the top of the front sight at the bottom of the black ring as indicated by the red box. The inner circles indicate where the bullets should strike and are sized so that getting all shots in the tan areas give an excellent chance at hitting the canonical 10-inch diameter vital zone at 300 yards. We describe how these targets should be used later in this paper.
Hunting Zero Targets
The multiple range sessions will incidentally help improve your shooting skills. You will likely have at least seven trips to the range and expend a box or two of ammunition during the months leading to the hunting season. We recommend you start the sight-in and fouling shot exercise at least three months before hunting season. The trigger time will serve to make one more comfortable with the rifle and its operation,
Rifle Zero Height
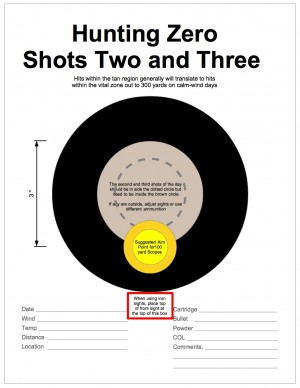
Figure 2. Hunting Zero Target #2. Use this target at 100 yards for the second and third shots in each of five range sessions using the same sight settings. Clicking on the picture downloads a PDF of the target that may be printed and used on the range.
The first step is to establish a preliminary zero and typically involves just one range session and less than a box of ammunition. The second step will use about a box of ammunition and adds the benefits of more trigger time and practice spread over a month or so. Your shooting skills are likely to greatly improve through this exercise so it is a good thing!
We recommend that the initial zero be 1.5 inches above the point of aim for scope-sighted rifles. The zero should be 3 inches above the top of the front sight of iron sighted rifles. We expand on why this recommendation in the paragraphs below and in the Point Blank Range Revisited paper.
Do not change the sight settings established during the initial zero until after you have completed these five additional trips to the range. Determine where the center for the five “first shots” and the center for the ten follow up shots on the second target. With some luck, you can adjust the sights so that the “first shots”will be in the center if the desired impact region and that all of the “follow up” shots are within about an inch of the center.
Target visibility considerations make the suggested zero slightly different for iron sighted and scope sighted rifles. For iron sighted rifles, the target is always hidden behind or below the front sight when the bullet is below the top of the front sight.
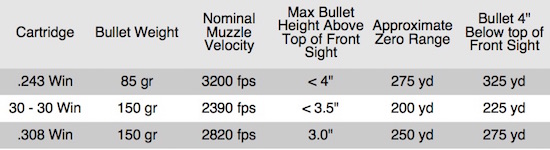
Table 2. Nominal Drops for Scope-Sighted Rifles Zeroed 3” High at 100 Yards. This zero keeps the bullet well within the vital zone to past 200 yards for most cartridges. Shots taken out to 300 yards are feasible with moderate adjustments for wind and elevation.
Figure 2 illustrates the recommended sight picture when using iron sighted rifles on the range. This is equivalent to putting the top of the sight at about the bottom of the heart of a deer.
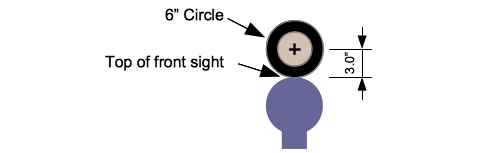
Figure 2. Sight Picture for Iron-Sighted Rifles: The front sight is generally large enough that the vital zone and, often the entire target, is completely obscured when the point of aim has to be elevated above the center. Our confidence in our ability to hit the target is significantly higher when we can see where we want the bullet to go. We can see the center of the vital zone over the most common hunting ranges by zeroing the rifle so that the center of the group is about 3″ above the front sight at 100 yards. This zero will keep the bullet above the front sight out to at least 200 yards even for the venerable 30-30 with a 150 grain flat point bullet.
Turning to the more common scope sight rifle, we have very much the same principle except that the crosshair is centered on the heart. The fact that the reticle is normally fine enough that we can see below the sight as well as above allows for this more central aim point.
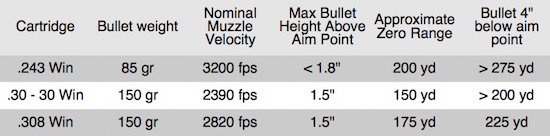
Table 2. Nominal Drops for Scope-Sighted Rifles Zeroed 1.5” High at 100 Yards. This zero keeps the bullet well within the vital zone to past 200 yards for most cartridges. Shots taken out to 300 yards are feasible with moderate adjustments for wind and elevation.
Figure 3 illustrates the recommended sight picture for a 100 yard shot at the range.
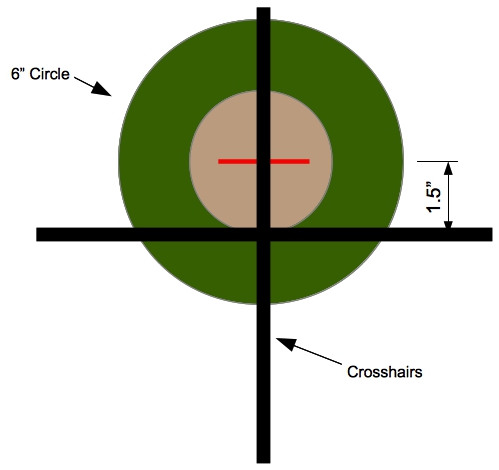
Figure 3. Sight Picture for Scope Sighted Rifles: Your scope sighted rifle should have a zero so that the bullet impacts about 1.5″ higher than the aim point at 100 yards. This zero gives a good balance between effective point blank range for medium game and convenience for casual shooting at improvised targets. The table shows that one can center the reticle on a clay pigeon size target and have a good chance of breaking it anywhere from the muzzle to beyond 150 to 200 yards depending on the rifle. At the same time centering the reticle on the vital zone gives a good chance of taking the animal out to more than 200 to 275 yards.
After the preliminary sight in, clean and maintain your rifle as would normally do. Keep the sight settings the same and make several trips to the range. Fire one shot and two follow-up shots to an adjacent target using the pace one might use for quick follow up shots with the rifle. The time between shots should allow for observation of target response and operation of the rifle. Typically, there will be at least two seconds between shots. The timing will help tell how much the impact point changes due to barrel heating
After shooting the three “hunting zero” shots, continue your range session as you would normally for practice and load development. Don’t use the two “Hunting Zero” targets for this additional practice but keep and use them for the remaining range sessions. By doing so, you will develop a five shot “First Shot” and ten shot “Follow Up” group that reflects different wind conditions, temperatures, and mind set. These two groups will better reflect what your shooting might be in the field because the same factors will be present, but possibly more extreme.
To repeat, use the same pair of targets for each five trips to the range. Each session, date and mark every shot on both targets. You will have a five-shot group in the “First Shot” target and a ten-shot group in the “Shots 2 & 3” target. The sizes of the groups are not critical as long as they are both smaller than three inches across the largest diameter. The dates will help eliminate flyers due to wind or called misses. We are looking for the center of each of the two groups.
Maintain your rifle as would normally do between each session. This rifle preparation should be the same as you use in preparing for the hunting trip.
The multiple visits to the range will also confirm that your sight is stable and that the zero remains constant. All too many of us have lived through the mental agony of seeing the zero inexplicably change between sessions because of a faulty or poorly mounted scope. Some us have also have wondered why a “perfectly aimed” shot missed in the field. We would rather have harvested an animal than to explain the miss!
Using the “Hunting Zero” Targets
Zero for the first shot of the day by aggregating the first shot impacts for at least five range sessions. This shot is the most critical because it is frequently the only one you get and, if done well, the only one you need.
The second and third shots are simulating follow-up shots and the objective is to determine the point of impact wander resulting from barrel heating and change in fouling. Determine average shift of impact point from first shot for the second pair of shots. If the shift is more than about 2 MOA, change ammunition or rifle to get a combination that will stay within 2 MOA. If changing ammunition or rifle is not desired or feasible, then decrease maximum range for hunting to a distance where the three shot spread will be less than about five inches.
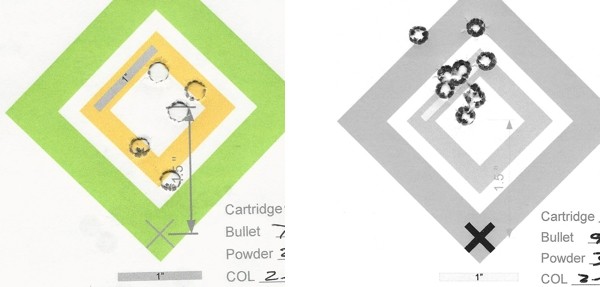
Figure 4. Example “Hunting Zero Target Pair: The target on the left is an aggregate of the first shot on each of five range sessions. The right-hand is an aggregate of the 2nd and 3rd shots on each of the five range sessions. Note that, while the first shot is centered at about 1.5” above the crosshair aimpoint, the right-hand target is a little higher. This is acceptable because the groups centers are about an inch apart and almost all of the shots hit within about 1.5 inches from the aim point.
Consider the “Hunting Zero” targets above. There are two aim points for each target. One is for scope sighted rifles and the second is for iron sighted rifles.
The center of the yellow circle illustrates where the crosshairs for a scope sight should be centered. The center of the desired 100 yard impact area is 1.5” above the aim point. This zero corresponds to the figures and tables for scope sighted rifles above.
The other aim point is at the top of the red square at the bottom of the black circle. This is where the top of the post or bead for an iron sight should be placed. Putting the target on top of the bead allows the shooter to actually see the desired impact point instead of guessing where it is. Again, the center of the circles is where the bullet should hit when properly sighted in.
The first shot should be inside the 1.5 inch diameter circle indicated by the slightly darker tan shading in the left hand target. Similarly, the second and third shots should impact within the 2” inch circle indicated by the dashed line in the right hand image. Any hits within the larger 3” diameter light tan circle suggest that they would be in the vital zone at 300 yards when appropriate holdover and wind corrections are made with the aim point.
There are two options if the suggested sight adjustment at the completion of the five range sessions, cannot bring both groups inside the tan areas. The first is to change your ammunition or equipment. The second option is to limit the maximum range to one where you can be sure all the shots will fall within the canonical ten inch diameter vital zone.
You may download and print these targets for your own use. The line on the left hand side is three inches long and can be used to verify that the image scales correctly going through the printer. These targets are best used after the basic sight-in is completed over one or more previous range sessions.
The first shot of the day during these subsequent sessions should be at the first target with the second and third into the second target. After that, continue your range session as would normally for load development, practice, plinking, and so on. Ideally, one should retrieve the targets and re-use them on several subsequent range sessions. A group will soon be observable on the “first shot” target and another for the “second and third shot” target.
Adjust the sights so the center of the five-hole “First Shot” group is at the recommended height at 100 yards. Also, confirm that the displacement of the ten-hole “Follow Up Shot” group is within about an inch from the “First Shot” group. At this point, you will have developed enough of a “range habit” that at least one more trip to verify zero will be just that much more fun!
Back Up Ammunition
This part of the Fouling Shot discussion is repeated here for emphasis:
Recent buying panics suggest that there will be occasions where your favorite ammunition is not available. Actually, there are multiple reasons why you may not have your favorite hunting ammunition on the day of the hunt. The obvious question deals with how to prepare for this so a hunt won’t be ruined for lack of ammunition.
This question is expanded with observations by one the authors during his experimental campaign:
The research question I am facing today is to find the one “true zero” if it exists for the scope of my rifle. Typically, I measure the data every shooting session and make the incremental adjustments when it seems they are needed.
The problem was further defined when I was having trouble getting ammunition for a while, a couple of years actually, and was dependent upon the kindness of strangers to get anything to shoot without regard to manufacturer or bullet weight.
It seemed I was making too many little adjustments. Every time I changed manufacturer or bullet load I had to move the zero on the scope to represent that difference in grouping. It was frustrating. I had to take the little cap off the scope, use the screwdriver to move a click or two, sometimes more, then screw the cap back on. No, that does not build character. At my age it just made me anxious thinking it was maybe me and not the ammunition. My vision and sensory-motor reflexes are not the same as 50 years ago. Maybe the stories about old age are true?
His research confirms that the impact point will change when ammunition or load recipe is changed. The real question is “How much change can we make and still keep the impacts inside the tan regions at 100 yards.
The best and most effective path for this determination is to shoot other suitable hunting ammunition and determine which, if any, meets the impact area criterion. Guess what, following this advice leads to more trigger time and fun at the range!
# # # #
About the Authors
Allen J. Schuh, Ph. D. is a retired college professor. He received his academic degrees in Psychology: A. B. 1963 San Diego State University, M. A. 1965 University of California, Ph.D. 1971 Ohio State University. During the 1960s he served in the US Navy. During service was a range officer for two years and qualified Navy Expert Pistol Shot with the 1911A1. He has published several dozen scholarly papers, nine patents, and a textbook. He maintains membership in scholarly and professional associations including: American Psychological Association, Association for Psychological Science, Institute of Operations Research and Management Sciences (INFORMS), and American College of Forensic Examiners International (Psychological Assessment).
Joseph Smith is a retired mechanical engineer who devoted several decades to research in weapons effects and weapons development at both the Air Force Armament Laboratory at Eglin AFB in Florida and at the Lawrence Livermore National Laboratory in Livermore, California. He is an avid shooter and reloader who has competed in the NRA 2700 matches (.22, .38, & .45 bullseye shooting) as well as international style air pistol. Among other things, the competitive shooting resulted in a team national record and the 1973 Arizona State champion in the air pistol. He is a Vietnam Veteran and an NRA Life Member. He has instructed rifle and shotgun skills for Boy Scouts of America shooting sports. He recently retired from the University of California after more than thirty years dedicated to research and development of a wide variety of weapons. Joe currently manages the website ShootersNotes.com focusing on a variety of rifle-related topics.
| Navigation Buttons: | ShootersNotes | The Fouling Shot | Point Blank Range Revisited |
|---|